Introduction
Inet-Cash is providing extensive options for accounting for your products on the Internet, no matter whether for classic memberships, for shop solutions or gateway solutions.
Our risk management tools are providing options for maintaining substantial plausibility checks and data corrections, blacklists and scoring procedures. Our modules are fully customizable to your specific business model and can be utilized in individual combinations and cascades.
Adding new web sites to your account is fast and simple. If you are nevertheless experiencing problems, please contact our support team for providing assistance for your web site setup.
For increasing your sales you can assign your web sites to an affiliate program and make it available with just a single link on your web site. We handle everything else.
Important for new webmaster:
Before you can accept payments for your web site through Inet-Cash, you are required to fill the registration form and provide associated registration documents.
Important for existing webmaster:
Before you can process changes or adjustments in your account, you are required to fill the registration form and provide associated registration documents.
Menu
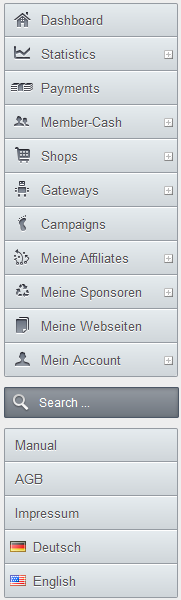
Once you are logged in, you will find the main menu on the left hand side, partially organized in subsections. Depending on your personal preference, the position of the main menu can be set either to the left hand side or the right hand side, by clicking the "change sidebar" link in the top right corner.
Specific menu areas that are not used for your account yet are indicated as inactive, e.g. the menu areas "Shop" and/or "Gateway", if you are only using "Member-Cash" in your account.
Dashboard
The dashboard is organized as an "event list" on the left hand side, and brief statistics on the right hand side, divided into 2 tabs:
- Chart + Last 7 days
- Today + Current Month
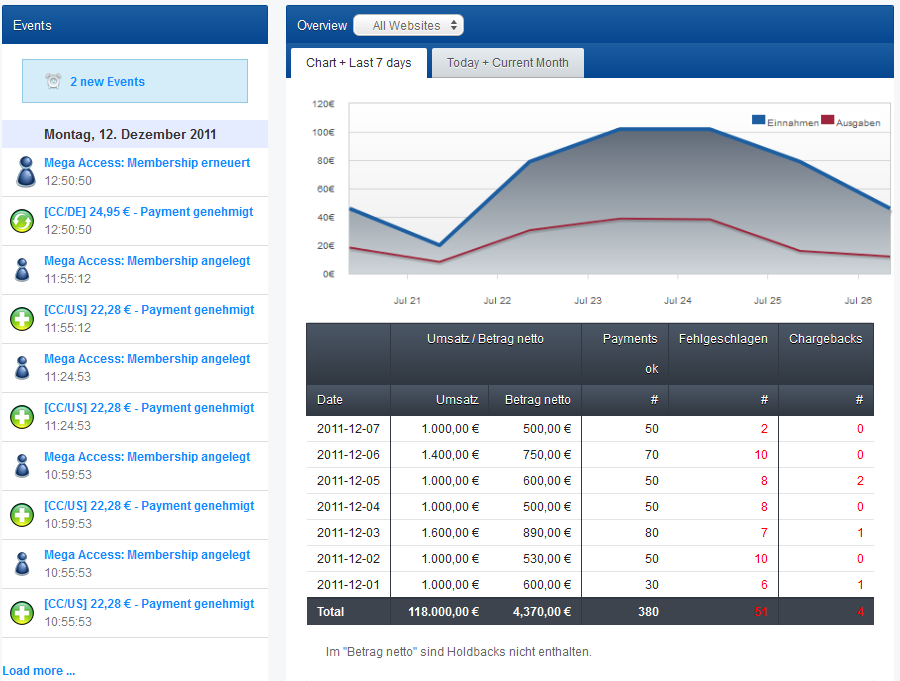
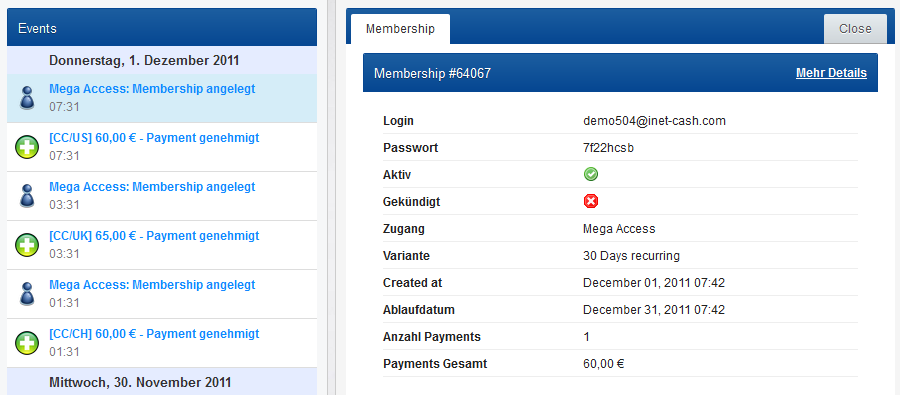
The events are presented as an infinite chronological list, new events are added automatically at the top of the list. Once you have clicked on an event, you will receive the main event details on the right hand side. From there you can change into a detailed overview for more information about the selected event.
Statistiken
This section is presenting the most relevant statistics, valid for all product areas (currently "Member-Cash", "Shop" and "Gateways").
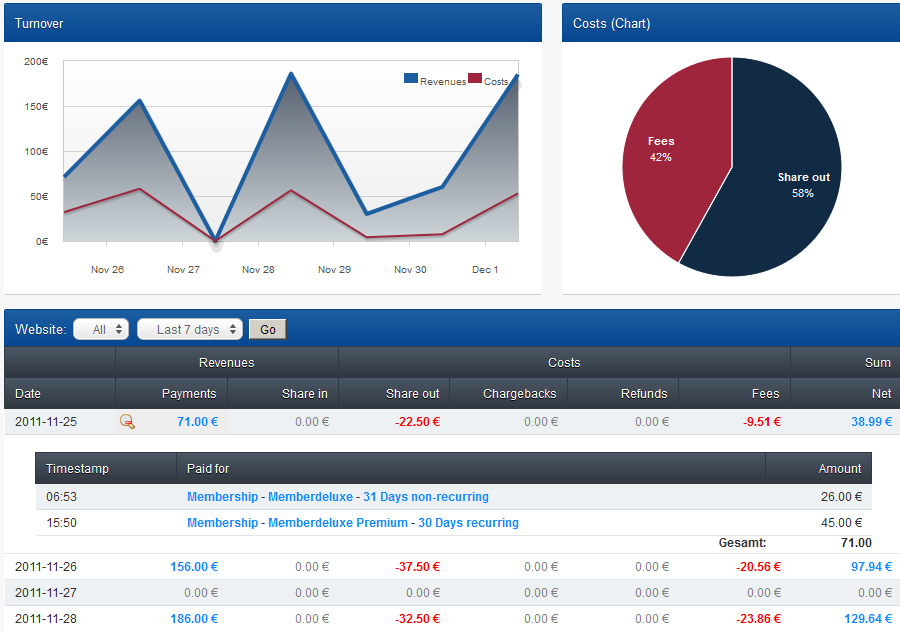
Cash Based Accounting
This statistic is summarizing and condensing all income and expenses (except holdbacks), for the period and web site selected. All numbers displayed in the statistic's lower area are clickable for receiving further details.
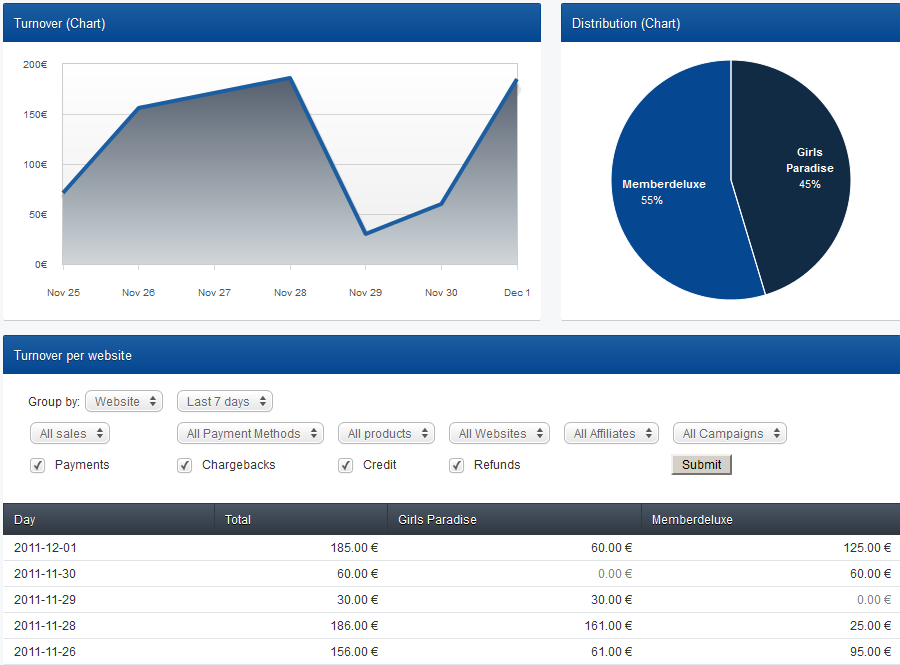
Umsatz-Auswertung
This statistic is providing a wide range of filters applicable to your turnover statistic, optionally separated by web sites or payment methods.
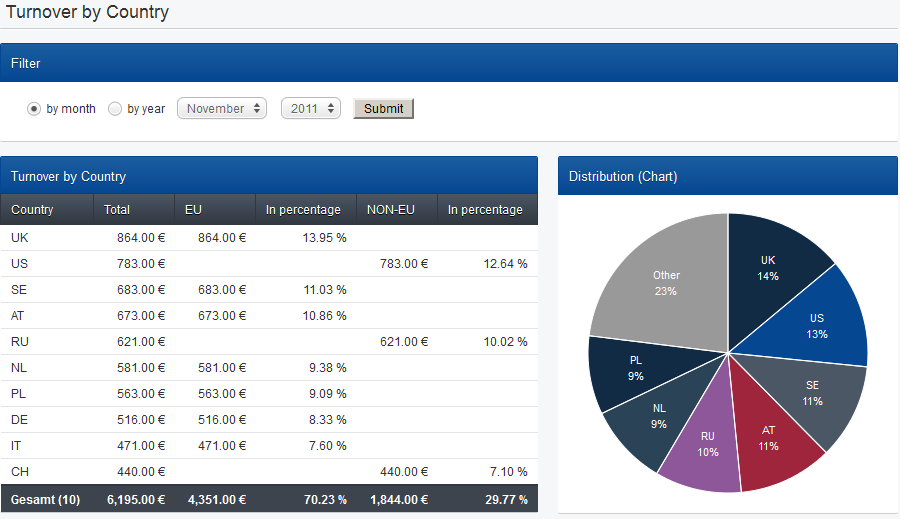
Turnover by Country
This statistic is presenting your turnover by month or year, separated by "Total Turnover", "Turnover EU" and "Turnover Non-EU".
Campaign Summary
Within an individual date range this statistic outlines the sales performance (conversion rates) of your campaigns - respectively your affiliates' campaigns.
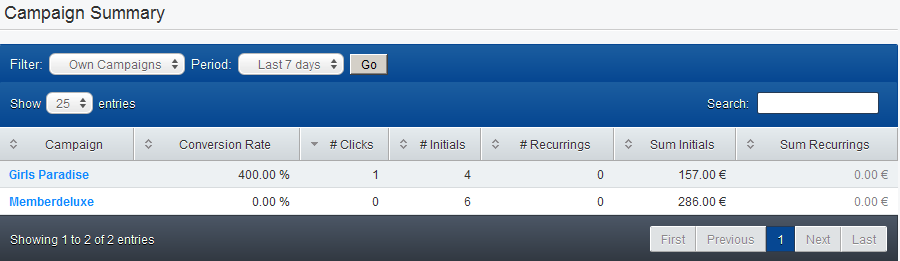
Furthermore you receive information about the click amounts, as well as the quantities and aggregates of all first and recurring sales within a campaign.
The details view allows you closer inspection of the selected campaign. You may also compare the selected campaign with up to 2 other campaigns, whether it’s one of your own campaigns or an affiliate’s campaign.
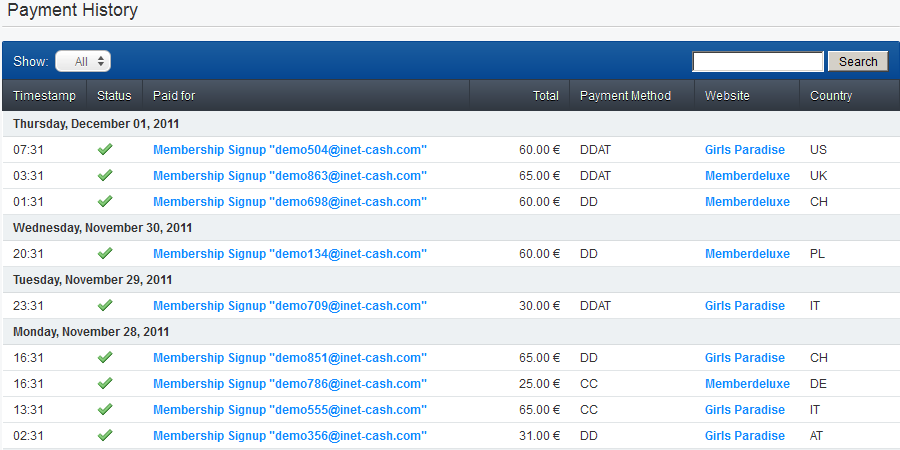
Payments
This is a list of all payments received for your web site/s, organized chronologically descending. You may filter the list by:
- All payments
- Only successful payments
- Only disputed payments (chargebacks)
- Only refunded payments
- Only failed payments
Member-Cash
Four simple steps for getting started
- Create Member Area (a new web site can be added at the same time)
- Create an "Access Type", for granting access to one or several member areas for the same or several different web sites.
- Create "Variants" for the new access type (one-time payments and/or recurring subscription payments)
- Create your "Payment Link" for integration in your join procedure.
Important:
- A website may contain one member area or several member areas at the same time (e.g. "Member Area - content current year", "Member Area - content previous years")
- An access type grants access to one member area or several member areas at the same time, either for the same or several different websites.
- Every access type is having different access variants (e.g. EUR 31 as a one-time payment for 31 days, or EUR 30 initial payment followed by EUR 25 every further 30 days until cancellation).
Please note:
Before you can accept payments, your new web site and your new member area must be reviewed by our support team. You can see the status in the overview (web sites and/or member area).
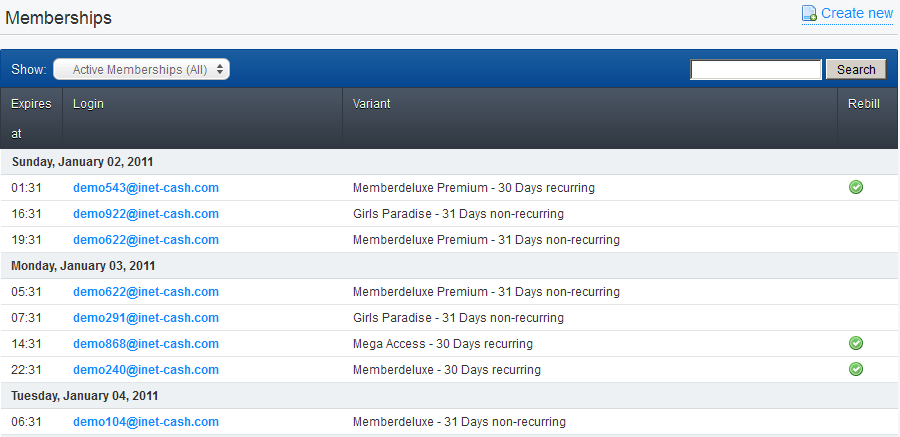
Memberships
This screen is showing you a list of all memberships, separated by days. The associated select box on this screen is giving options for filtering the list as follows:
- Active memberships (All)
- Active memberships (onetime payments)
- Active memberships (recurring/subscriptions, not cancelled yet)
- Active memberships (recurring/subscriptions, cancelled)
- Inactive memberships
- Custom memberships (created manually)
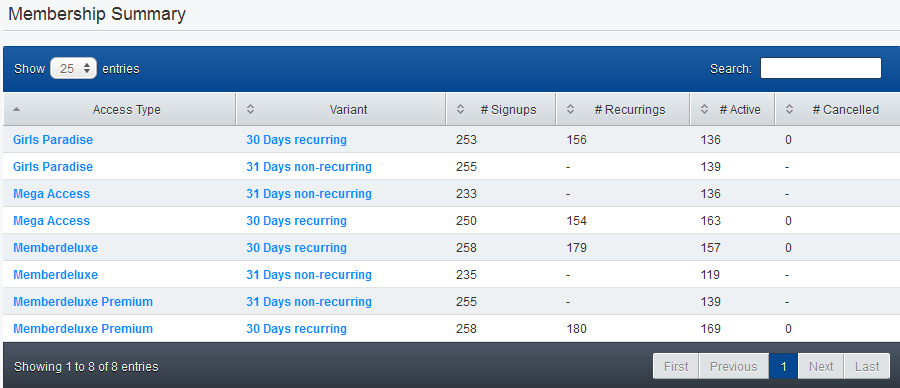
Membership Summary
The membership summary is giving you an overview about the success of your individual access options (number of first and recurring payments, number of active memberships, number of cancelled memberships).
Payment Links
This area is providing your payment links. Upon selecting an access type, you are receiving the associated payment link instantly on the right hand side.
Furthermore you can determine a specific access variant or payment method as the default selection upon your customers entering the payment form. Using this option will produce a new payment link.
Important
If your access type is granting access to the member areas of several different web sites, you will receive separate payment links for each web site individually. We kindly request you pasting the correct payment links on the correct web sites, for every web site individually. This procedure is of relevance for a correct accounting, since the turnover of a sale can be assigned to only one single web site.
For Example: You have an access type named "Mega Access", for granting access to the member area of "Girls Paradise" and also to the member area of "Memberdeluxe". If you would now use the payment link of "Girls Paradise" on BOTH web sites, it means that all turnover from this access would be assigned to "Girls Paradise".
The Member-Cash payment pages you will find here.
Access Types - Variants
Here you will find a list of all access types added previously.
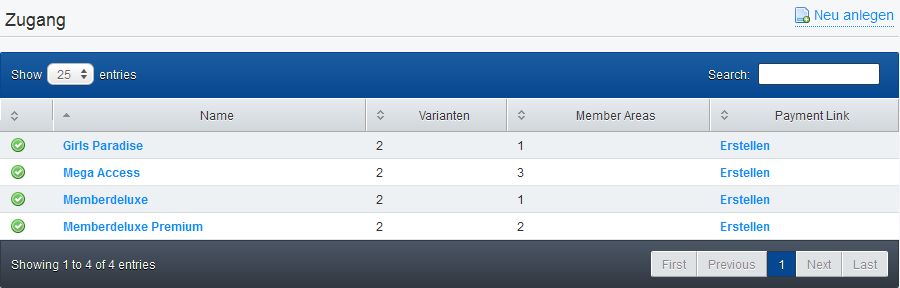
Following the selection of an access type, you will be provided all details for the selected access type and may edit it.
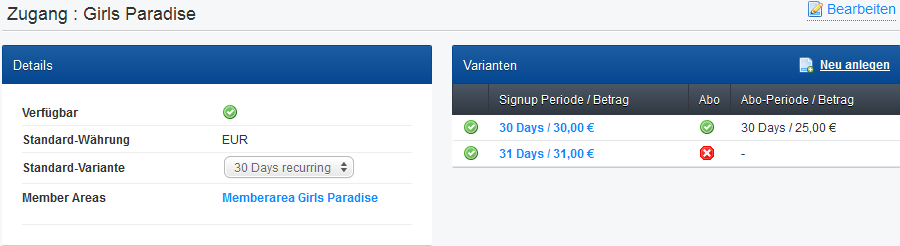
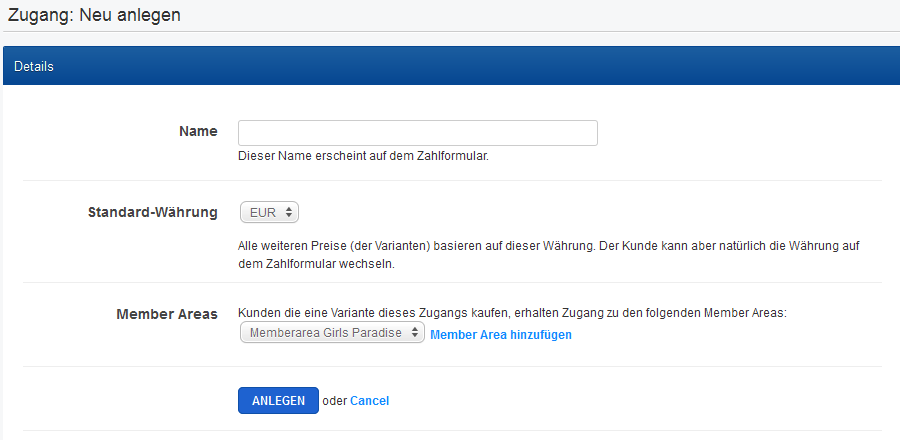
Access Type: Create New
Every access type is assigned an individual name and a default currency. Your customers may though change the currency during the payment procedure. In the last step you are assigning the new access to one or several member areas. You may chose from all member areas that have been added to your account previously.
Variant: Create New
In this screen you are adding variants to the access type created above. In the first step you determine, if this variant represents a one-time payment, or a recurring subscription. Next you are setting the access period, the price and the accepted payment methods for this new variant. Please note that for recurring subscriptions only "Credit Card" and "Direct Debit" are available.
For a recurring subscription you may also determine, if this is either an infinite subscription until the customer cancels his membership, or if you want to limit the number of membership extensions to any number between 1 and 24 recurring charges.
Finally you may determine, if this variant is subject to a certain validity period within a specific date range. This way you may e.g. offer special promotions related to seasonal events, like Easter, Christmas, etc. A variant that has been assigned a specific validity period will always be displayed as the first entry at the top of the variant list on your payment form, above all other variants including the default variant. Once the validity period has expired, this variant will automatically be removed from your payment form.

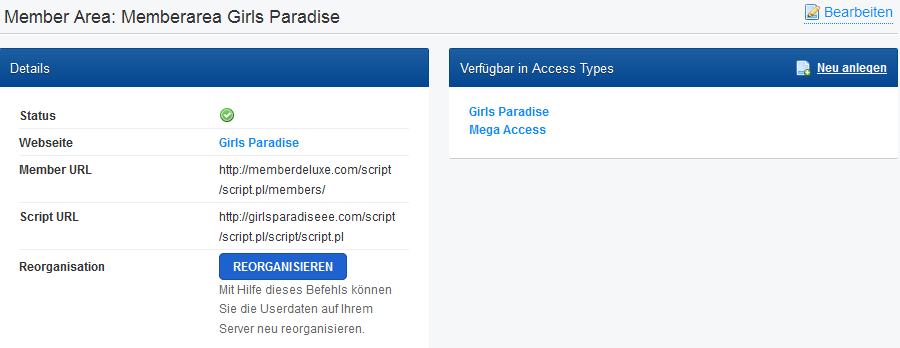
Member Areas
Here you will find a list of all member areas added previously.
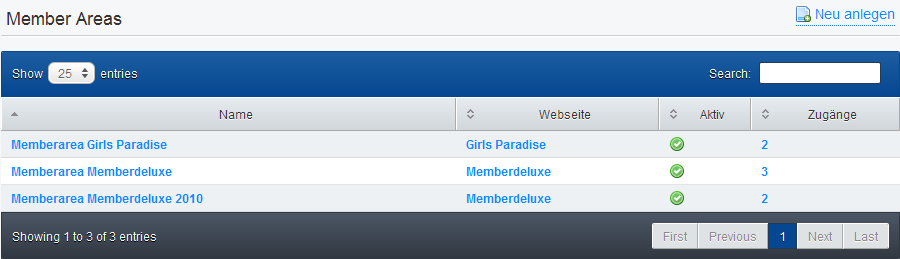
Following the selection of a member area, you will be provided all details for this member area and may edit it.
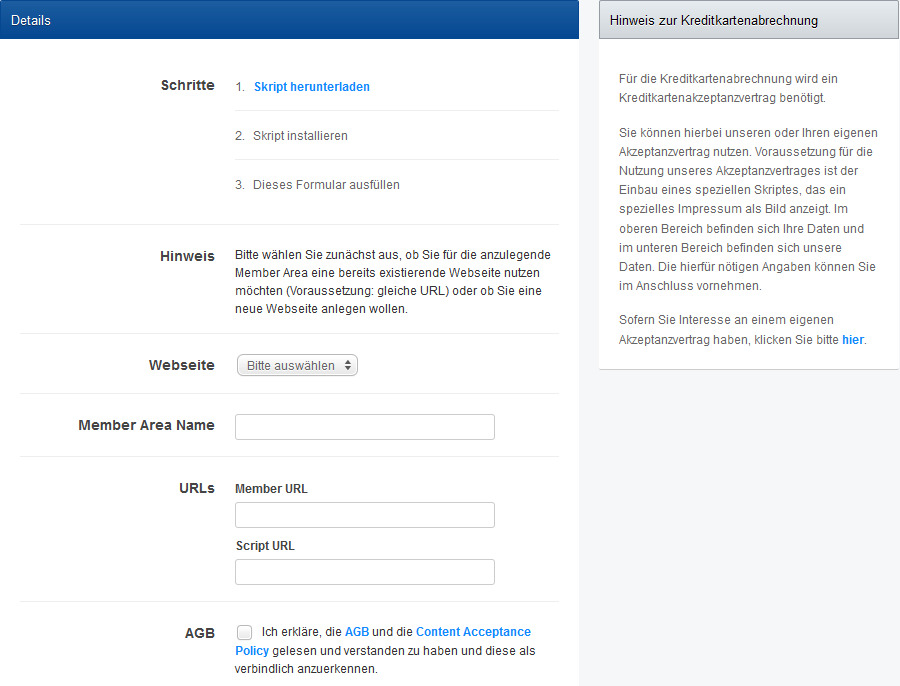
Member Area: Create New
The following steps are required for adding a new member area to your account:
- Download script
- Install script, according to the installation guide provided in the "Readme" file
- Filling a form as follows
Shops
In this area you will find all relevant information about your shop solution/s. A preview of the payment pages for the "Shop Solution" you will find here.
Shop Payments
List of all payments made in your shop solution.
My Shops
List of all shops that have been set before and procedure for adding new shop pages.
Two simple steps for getting started:
- Create new shop web site
- Request documentation
Please note:
Before you can accept payments for a new shop setup, you shop page or web site
is subject to a review by our support team. You will find the status of your shop review in the web sites overview.
Gateways
In this area you will find all relevant information about your gateways (Custom Gateway Solution).
Please note:
For maintaining your own gateway you are required to maintain an own merchant
contract for accepting credit card payments.
Services
List of related services (e.g. processed address checks).
Voicecalls
List of all voicecalls processed previously.
Two simple steps for getting started:
- Create new gateway web site
- Request documentation
Please note:
Before you can accept payments through your gateway solution, your gateway
setup is subject to a review by our support team. You will find the status of your shop review in the web sites overview.
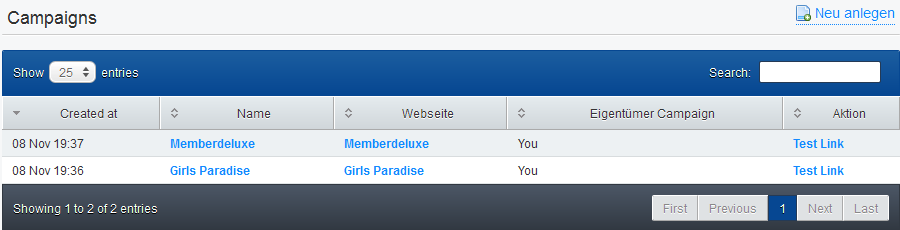
Campaigns
In this area you will find a list of all campaigns, including your own and your affiliates' campaigns.
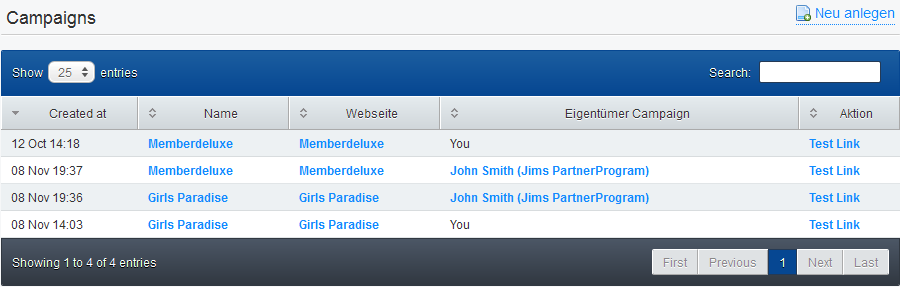
The first campaign is created automatically by Inet-Cash: the name of this default campaign is "Standard", with a target-URL identically equal to the URL of your web site. Very likely this campaign target ist he one that is used by the majority of your affiliates most often. These information can be edited for every web site individually, in the section "My Websites". As an example, if you are currently running a special event promotion (e.g. Christmas discounts), you may want to edit the target-URL of your default campaign, for redirecting all affiliate traffic directly to the page where you are promoting the special, though excluding all affiliates who are using an own target-URL that has not been set or edited from your end.
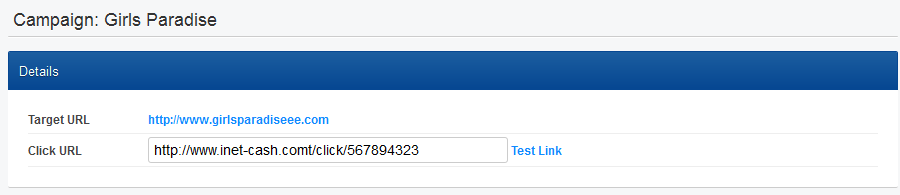
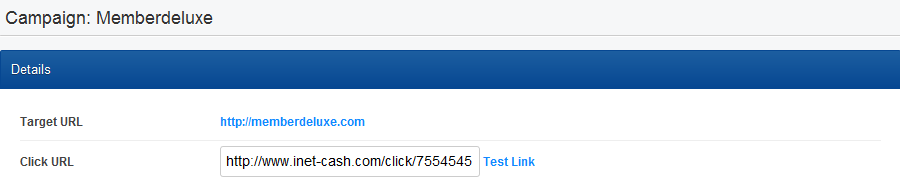
Campaign-Link
If you click one of the campaign names here, you will receive the specific campaign link that you would use as a text link, banner, etc on your web site for promoting this specific campaign. Every click and associated turnover resulting from this link will now be assigned to this specific campaign and outlined accordingly in the "Campaign Summary" (see statistics).
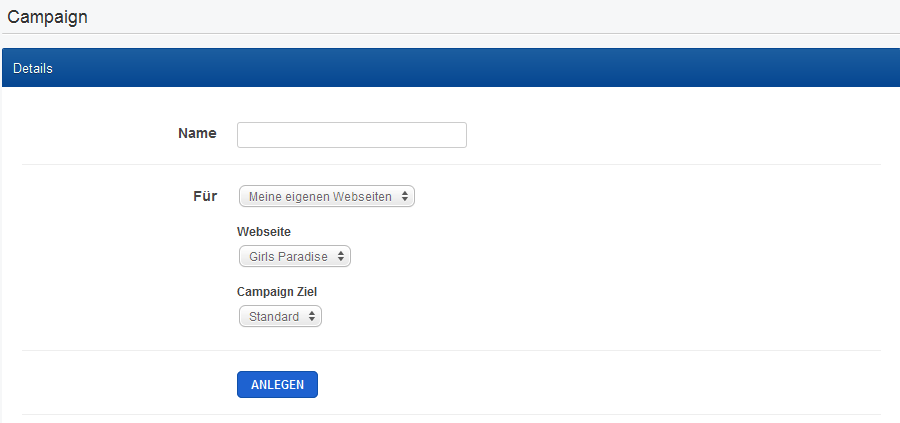
Campaign: Create New
On this screen you are creating a new campaign. We recommend that you are using meaningful campaign names for proper identification. Upon providing a campaign name please determine, if this campaign is targeting one of your own web sites or the web site of another webmaster. The latter option would turn yourself into an affiliate for another web site. In the last step please select one of the existing campaign targets, or create a new target.
My Affiliates
In this area you will find a list of your affiliate programs, and all affiliates across all affiliate programs.
Affiliate Programs
Basically you may chose between 3 different sharing types:
- Pay per sale (percentage)
- Pay per sale (fixed amount in EUR)
- Pay per Lead (onetime share in EUR)
You may assign any number of web sites to your affiliate program. In theory, if you want to maintain the same sharing type for all participating web sites, you would need to create only 1 affiliate program for all of your web sites.
A web site may though be assigned to several different affiliate programs at the same time. For example you could create an affiliate program based on "pay per sale (percentage)", and a further one based on "pay per lead (onetime share in EUR)". In such scenario you would leave it to the affiliates' personal preferences which of the available options they prefer.
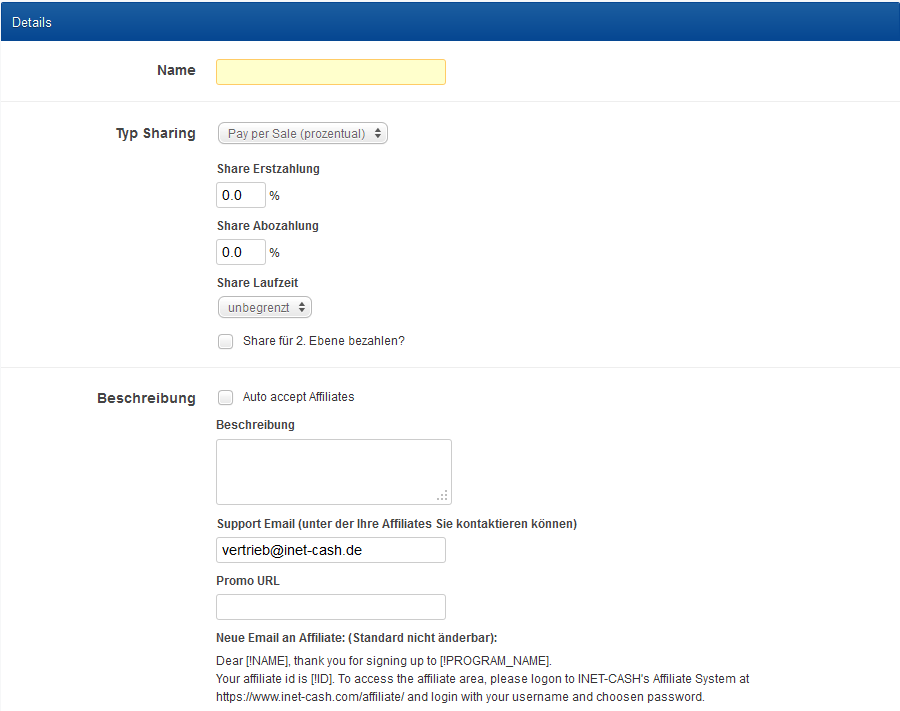
Affiliate Program: Create New
In this area you are creating a new affiliate program.
First you assign a meaningful name to your new affiliate program and determine which sharing type you like to use (see above). If you are deciding for sharing type "pay per sale" you can set individual shares for all initial payments and all recurring payments separately. Moreover you can set how many times the share will be paid to the affiliates for recurring memberships, either indefinite times or only x times. Furthermore you can set, if your share terms also qualify for 2nd level share payments (new webmasters referred by affiliates). Please note that if you allow 2nd level shares, these shares will always be paid, at no time limit, unless the 2nd level webmaster is yourself.
The option "Auto-accept Affiliates" let's you decide, if new affiliates upon their registration are added and approved to your affiliate program automatically, or if you prefer a manual review of new affiliates first. For your notification new affiliate signups are listed in the dashboard's event list. Furthermore you may request dedicated notifications about new affiliate signups, either by email or SMS. Please note that SMS notifications are subject to a charge.
The description of your affiliate program is part of the affiliate join page.
Moreover you are having options for providing a separate support email address for affiliates, and including a promotion URL in your affiliate program description. Such promotion URL would e.g. be used for providing promotion material to your affiliates (banner, buttons, galleries, etc).
As a final step you may specify an individual footer text for the notification email received by new affiliates upon their registration.
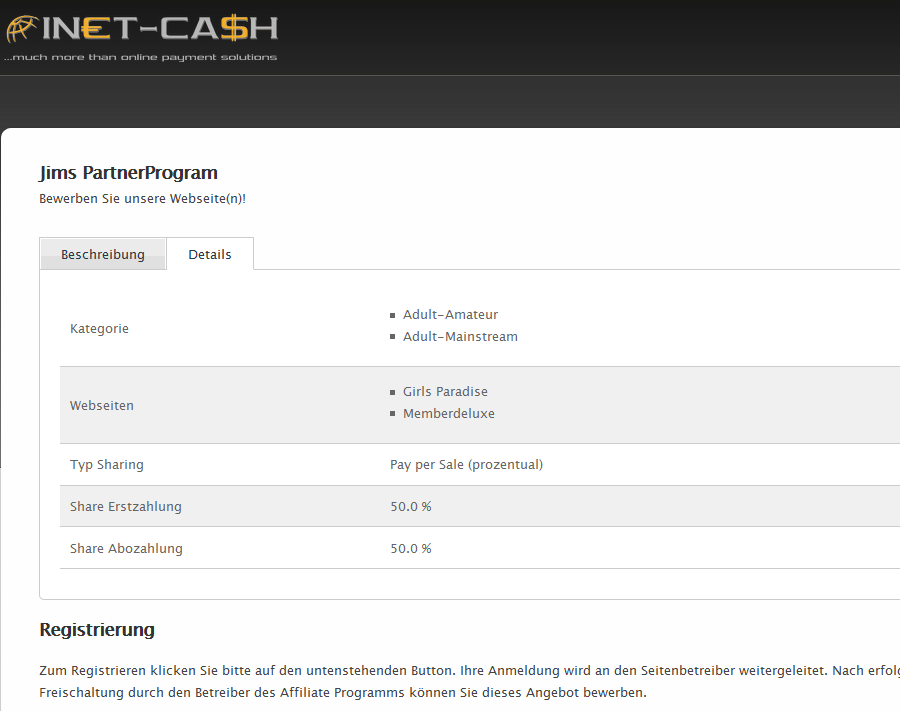
Join Page for Affiliates
This is a copy of the page (see "Details") for joining your affiliate program, exactly how it is presented to your affiliates. In tab "Description" you will find your affiliate program's details as they have been provided during the setup procedure.
Listing Affiliates
This is a list of all affiliates and associated information about which affiliate programs they promote.
From the column "2. Level" you can recognize, if 2nd level shares are paid or not. Those 2nd level shares would not be paid, if either you didn’t provide a 2nd level share percentage, or if the affiliate was touted by yourself.
From the column "Individual Share" you can recognize, if you have entered an individual share for this affiliate.
My Sponsors (Affiliate-Cash)
Listing Shares
In this area you will find a list of your shares in chronologically descending order.
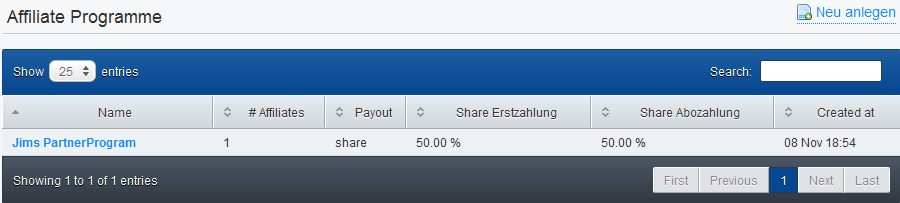
Affiliate Programme
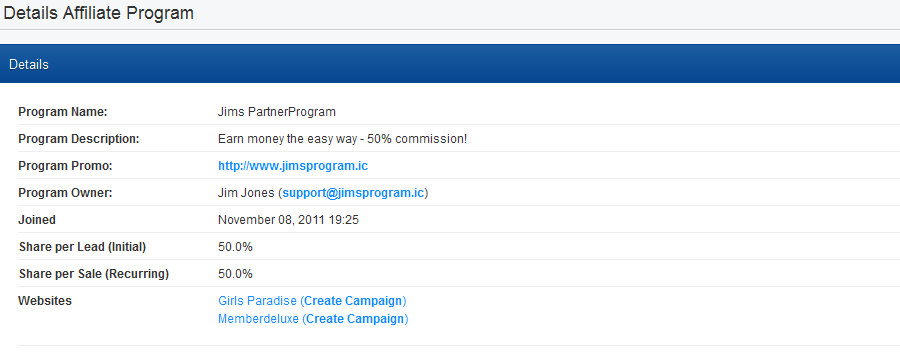
In this area you will find a list of all affiliates programs that you have been registered to.
Once you have registered to an affiliate program, please check the program’s details page for integrating a campaign for this affiliate program on your web site.
On the program’s details page please select the web site/s that you wish to promote and click "Create Campaign".
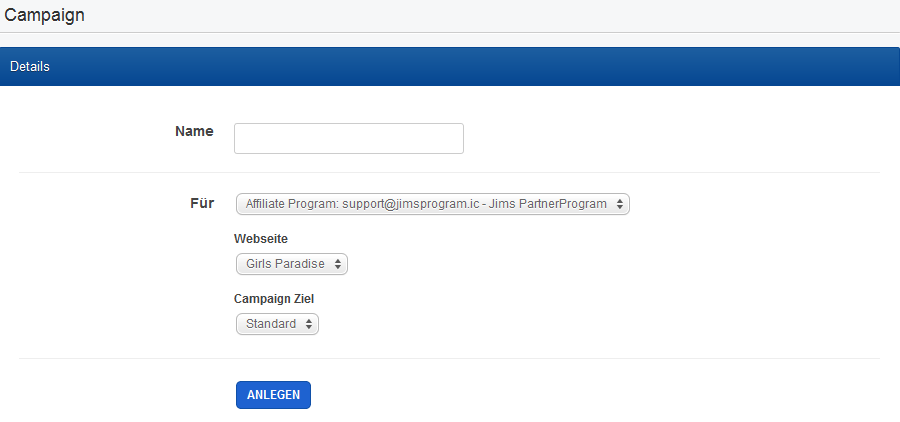
Alternatively you may create a new campaign in section "Campaigns -> Create New".

Please assign a meaningful name to the name campaign and select which affiliate program and web site you want to assign this campaign to.
Once you have created new campaigns you will find them listed in section "Campaigns".
If you click one of the campaign names, you will receive the link that you need for placing a text link, banner, etc on your web site. Every click and associated turnover resulting from this link will now be assigned to this specific campaign and outlined accordingly in the "Campaign Summary" (see statistics).
My Websites
This is a list of your web sites that have been added to your account before.
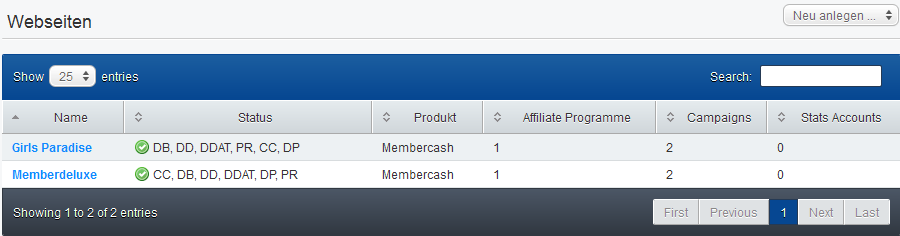
In this area you are also provided options for creating individual statistic access accounts. A webmaster logging in with such statistic access account will see all statistics only for the web sites that the statistic access account has been assigned to.
My Account
In this area you will find several specific settings referring to your account. You will also find your account's payout information here.
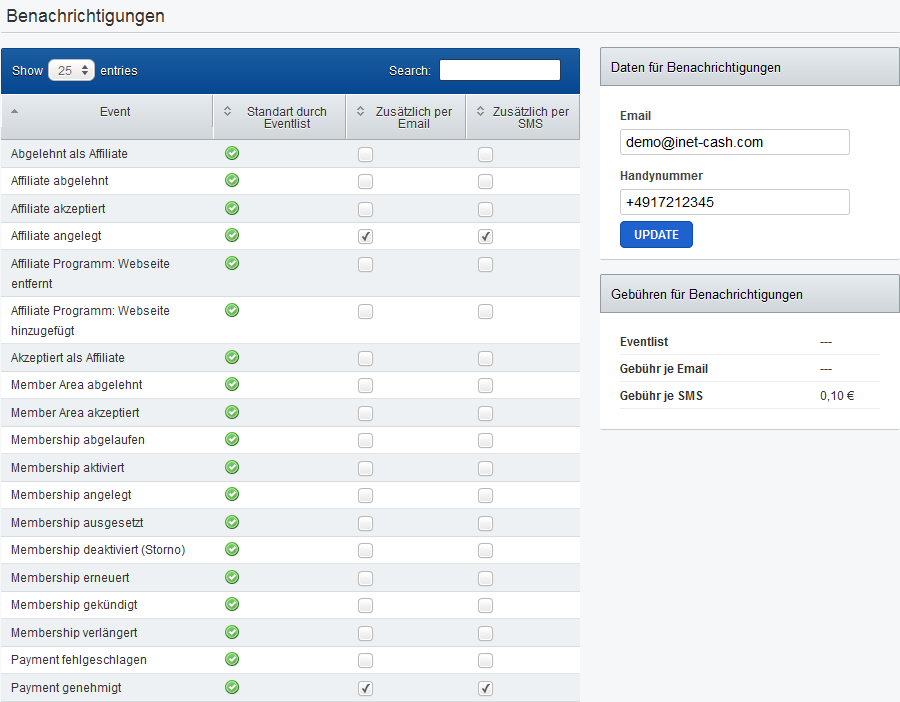
Notifications
In this section you may request notifications for specific events. By default all events are notified in the dashboard's event list. Furthermore you can request notifications by email and/or SMS. Please note that SMS notifications are subject to a charge.
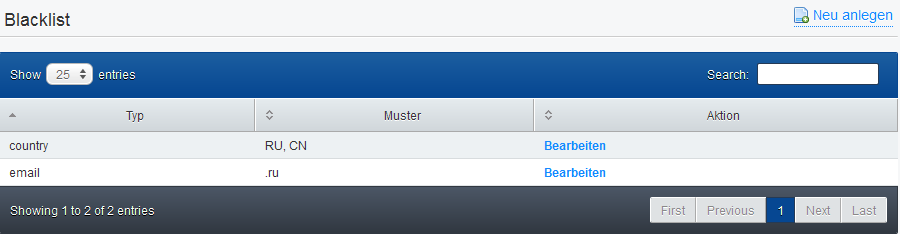
Blacklist
In this area you may exclude specific customers from making payments on your web site. Exclusions can be maintained based on:
- Email address (full or partial address)
- IP address (full or partial address)
- Countries (separated by comma)
Payouts
In this area you will find your account's settlement statements. New statements become available for download at the beginning of a new month for the previous month.
Profile
In this area you will find your account's profile and registration data. Furthermore you will find your webmaster referral link here, for referring new webmasters. If a new webmaster referred by you is maintaining 2nd level shares, you are automatically participating from his payouts, in the amount of the 2nd level percentage set by the webmaster.
Important for new webmaster: Before you can accept payments for your web site through Inet-Cash, you are required to fill the registration form and provide associated registration documents.
Important for existing webmaster: Before you can process changes or adjustments in your account, you are required to fill the registration form and provide associated registration documents. These steps are also required for receiving your payouts for December 2011.
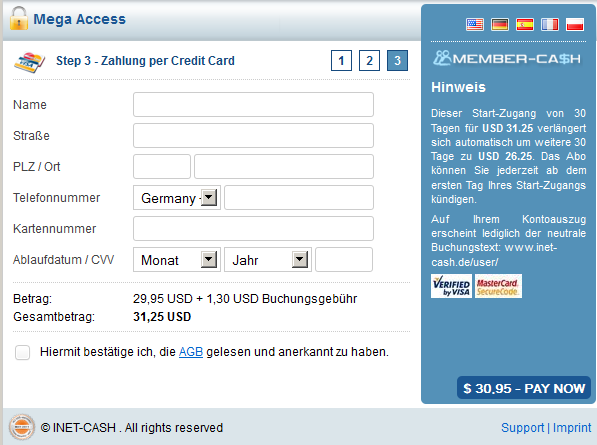
Payment Pages Member-Cash
Standard (wthout Quickpay)
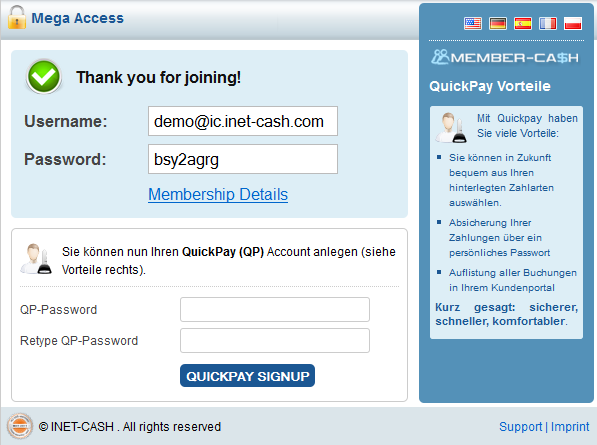
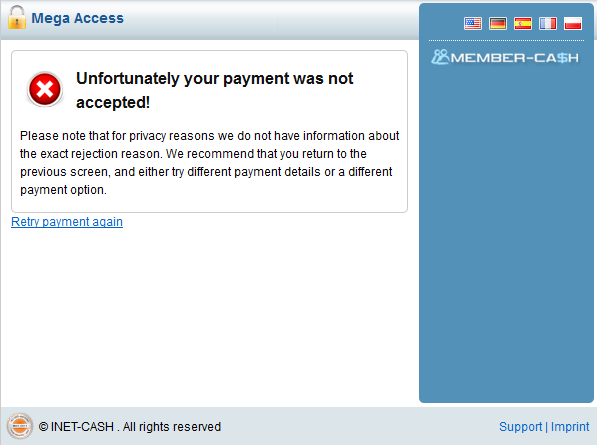
In this area you are receiving an overview of the payment process from your customer's point of view.
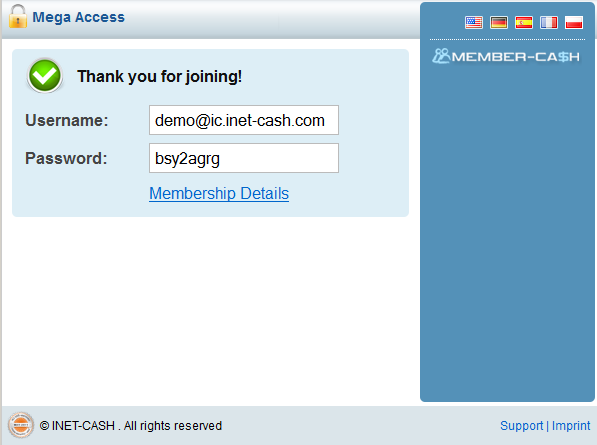
Upon submitting a payment successfully, your customers are presented an option for creating a "Quickpay Account", by assigning a separate "Quickpay Password". The advantages of a Quickpay account are:
- Your customer may conveniently access the payment methods and associated detail data that he was using already before.
- Additional password for additional fraud protection
- Convenient overview of all payments made via the customer's Quickpay account before


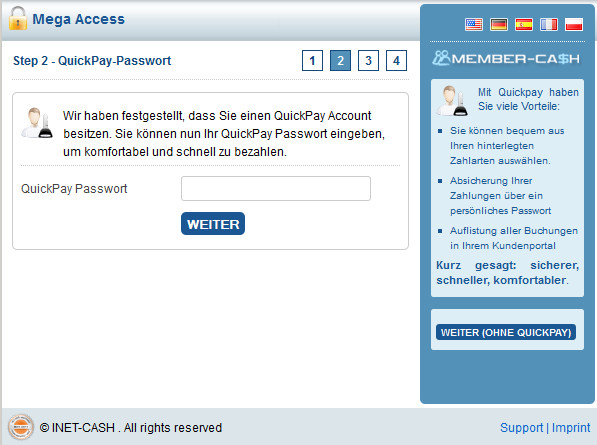
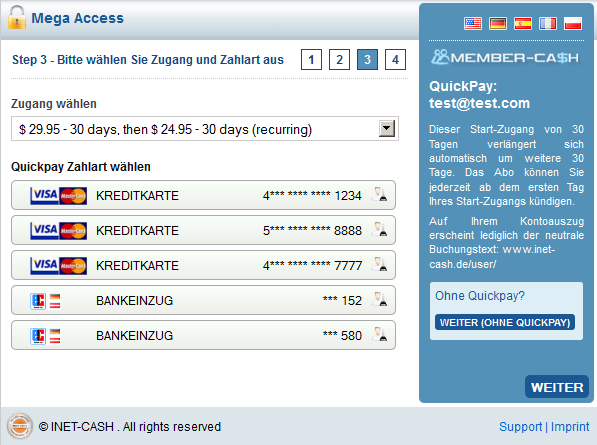
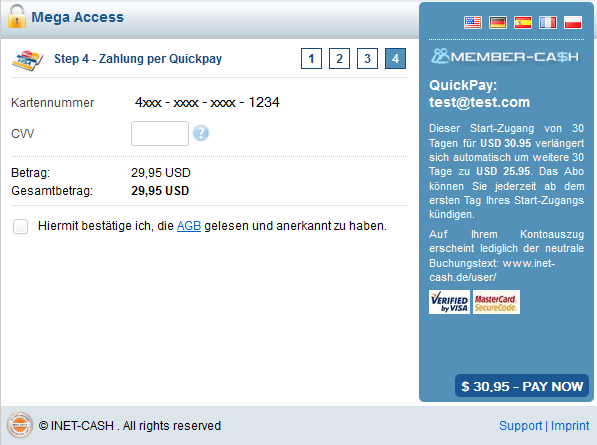
With Quickpay
In this area you are receiving an overview of the payment process from your customer's point of view, if the customer is already using a Quickpay account.
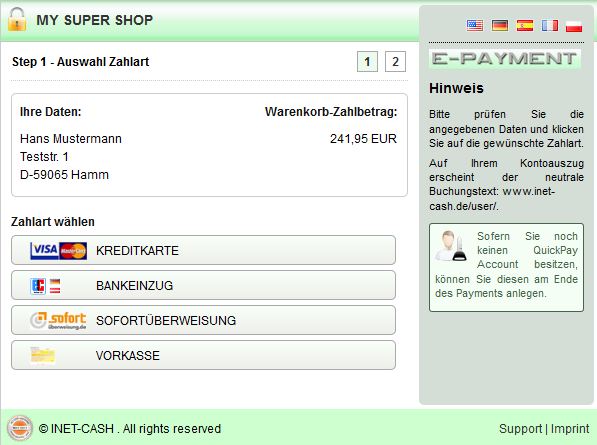
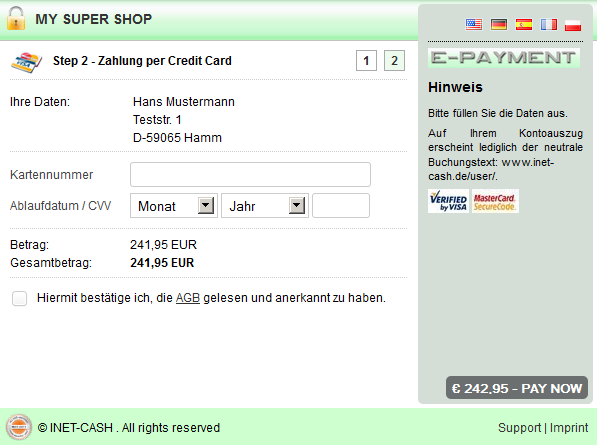
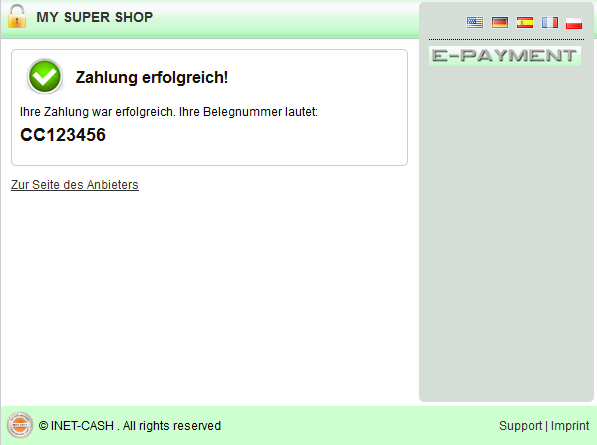
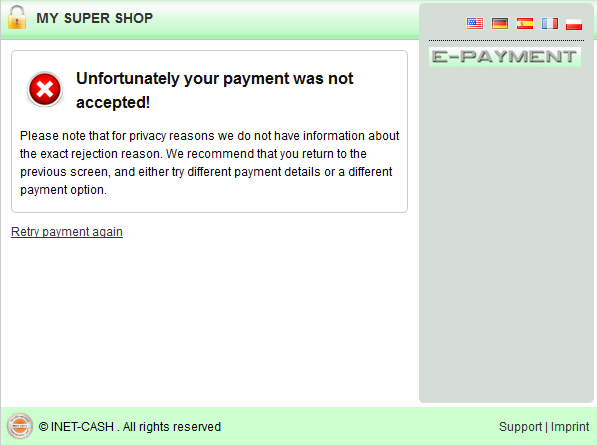
Payment Pages Shop Solution
In this area you are receiving an overview of the payment process from your customer's point of view.
If you customer has opened a Quickpay account previously already, the payment procedure for the shop solution is analogous to the payment procedure in Member Cash, outlined above.